Simple Boho Style Crochet Crop Top Pattern With Fringe
Making Tasseled Summer Sweater
We continue with summer knitting models. Next up is a sweater recipe that we can easily knit for everyone, big or small, and use it with love. It is a wonderful example that we will knit as summer blouse models. We can even use it in summer knitting models by adding sleeves. You can wear it on the blouse with or without tassels on the hem.
You can use mercerized threads, linen threads, cotton threads for making fringed knit sweaters. It would be correct to use suitable threads for summer. It is necessary to use non-sweating, bacteria-free threads. If we talk about tassel knitting models, we have a very stylish gilet model. You can reach the details from the knitting gilet example. We will talk about 2 different recipes from crocheted summer knits and motif knitting models. Knitted summer blouses in 2 different models are 2 magnificent models that you will like very much. One of the knitted bustier models, one with a motif and the other with a plain weave. Now let’s talk about the tasseled summer sweater that we will like very much and will complete in a short time.
How to Knit a Tasseled Sweater?
Our motifs on the lower sides are an example of the 3 handrail groups that complete the motif on the upper part. Tasseled summer sweater is one of the easy knitting models. The lady begged, the gentleman liked it, it is a very stylish and very popular summer knitting.
It is a great model to be used on dresses, t-shirts, singlets, and to be used with shirts. Let’s examine how to knit a sweater step by step with pictures.
It is an easy and very stylish model. Those who are new to knitting can easily knit. Let’s watch the making of summer sweater with tassels from the video. Let’s knit for ourselves, our little girls, our young girls.
materials
#2 Sportweight yarn
I used 3 colors of Alize Bella #2 sport weight yarn
Crochet hook size 5mm
scissors
Yarn needle
Stitch markers
*These materials contain affiliate links, for which I make a small commission. It’s no extra cost to you, makes shopping easier and helps to keep the lights on.
Stitch Used & Code (US Term)
ch = chain
st = stitch(es)
sl st = slip stitch
hdc = half double crochet
dc = double crochet
sp = space
sc = skip
REP = repeat
RS = right side
WS = wrong side
” = inches
Skill: Easy
Notes:
The pattern is written in English US terminology
This pattern made as US women’s Sizes XS( S, M, L, XL, XXL )
In this picture I have demonstrated with size Small
This crop top is worked flat in two separate pieces from the bottom up and then sewn together. We’ll start by making our granny squares and sewing them together, then crochet the body part. The fringe is added later.
Yarn needed:
Color A = 360( 390, 440, 490, 540, 570 ) Yards
Color B = 20( 25, 30, 35, 40, 45 ) Yards
Color C = 12( 15, 18, 21, 24, 27 ) Yards
Gauge blocked:
17 st (dc and ch sp) X 7 rows = 4″
Square measurements = 3.5″
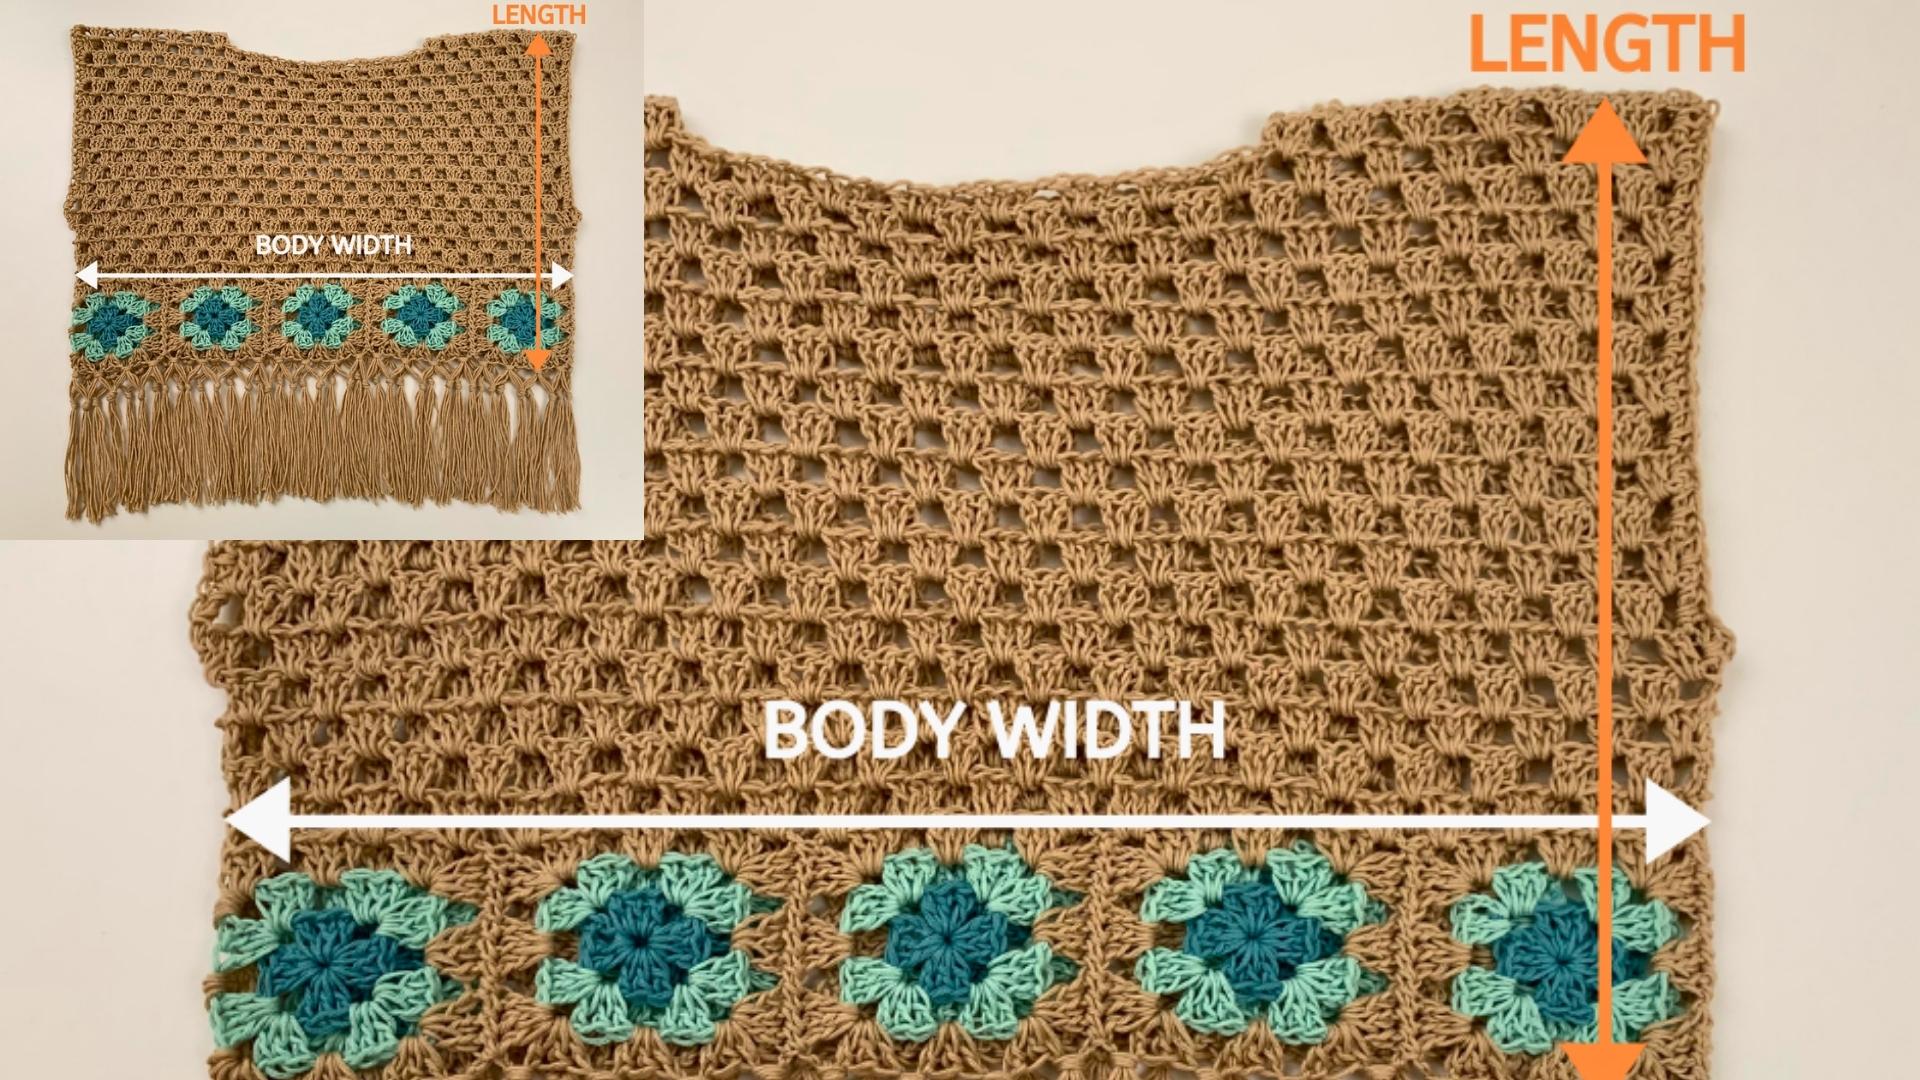
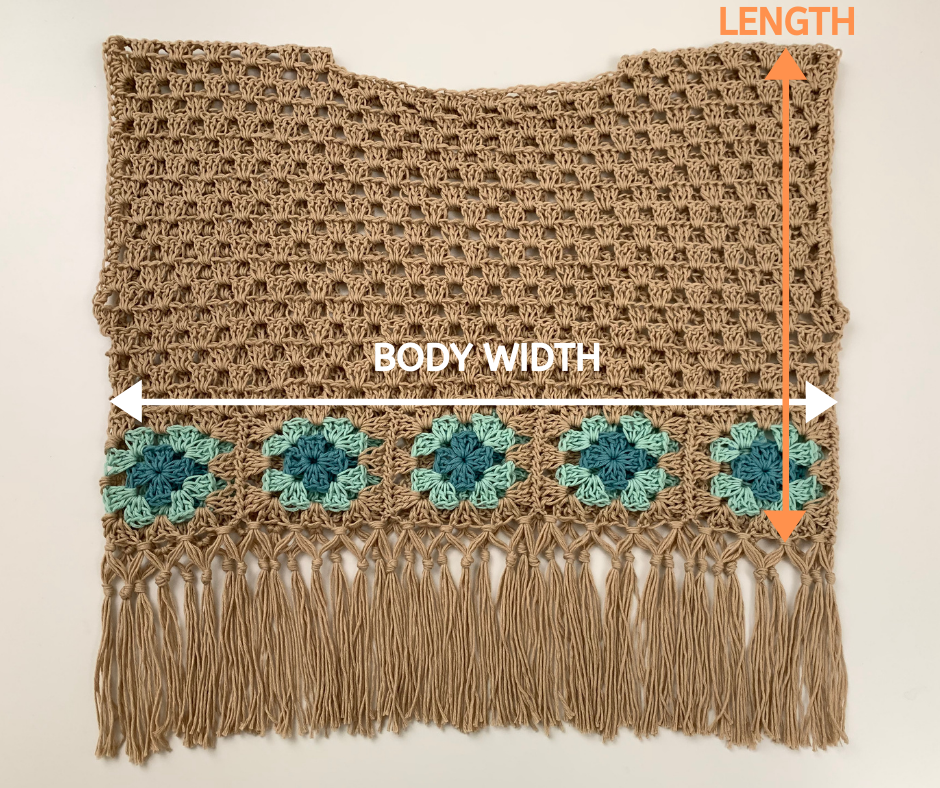
Measurements (After blocked)
*The length doesn’t include the fringe
XS = 14.82″ Body width across X 13.78″ Length
S = 18.58″ Body width across X 13.78″ Length
M = 22.35″ Body width across X 14.92″ Length
L = 26.11″ Body width across X 16.07″ Length
XL = 29.88″ Body width across X 17.21″ Length
XXL 33.64″ Body width across X 17.21″ Length
CROCHET CROP TOP PATTERN
BODY PANEL (MAKE 2)
square
Notes: For the squares, all the sizes are made the same but just use different amounts of the squares. Round 1 – 3 is 1 square.
XS = Make 4 squares
S = Make 5 squares
M = Make 6 squares
L = Make 7 squares
XL = Make 8 squares
XXL = Make 9 squares
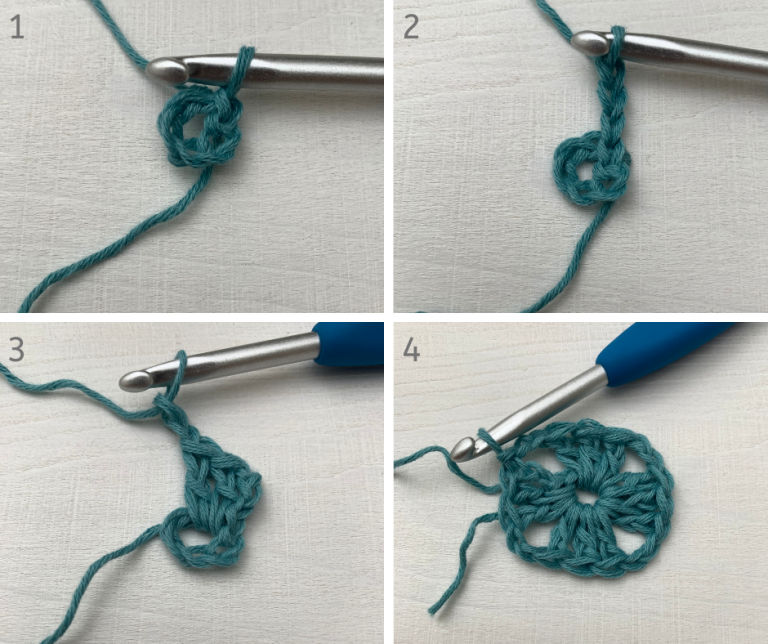
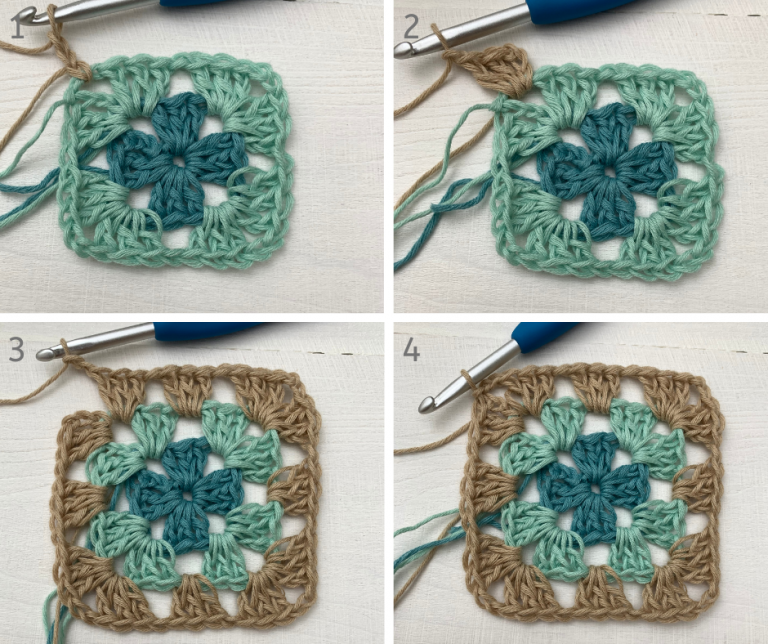
Round 1 (Color C): ch 6, sl st into the first ch that we did to form a ring, ch 3 (count as 1 dc), 2 dc into the ring sp, *ch 2, 3 dc into the same ring sp* REP from *TO* 2 more times, end with ch 2, sl st into the third ch that we did, cut the yarn. Check picture below
Round 2 (Color B): Add new yarn into any of the ch 2 sp, ch 3 (count as 1 dc), 2 dc into the same ch 2 sp, ch 1, *(3 dc, ch 2, 3 dc All into the next ch 2 sp/the corner), ch 1* REP from *TO* around and for last sp is going to be the same sp that we did the fist 3 ch and 2 dc/the corner, 3 dc into that sp , ch 2, sl st into the third ch, cut the yarn. Check picture below
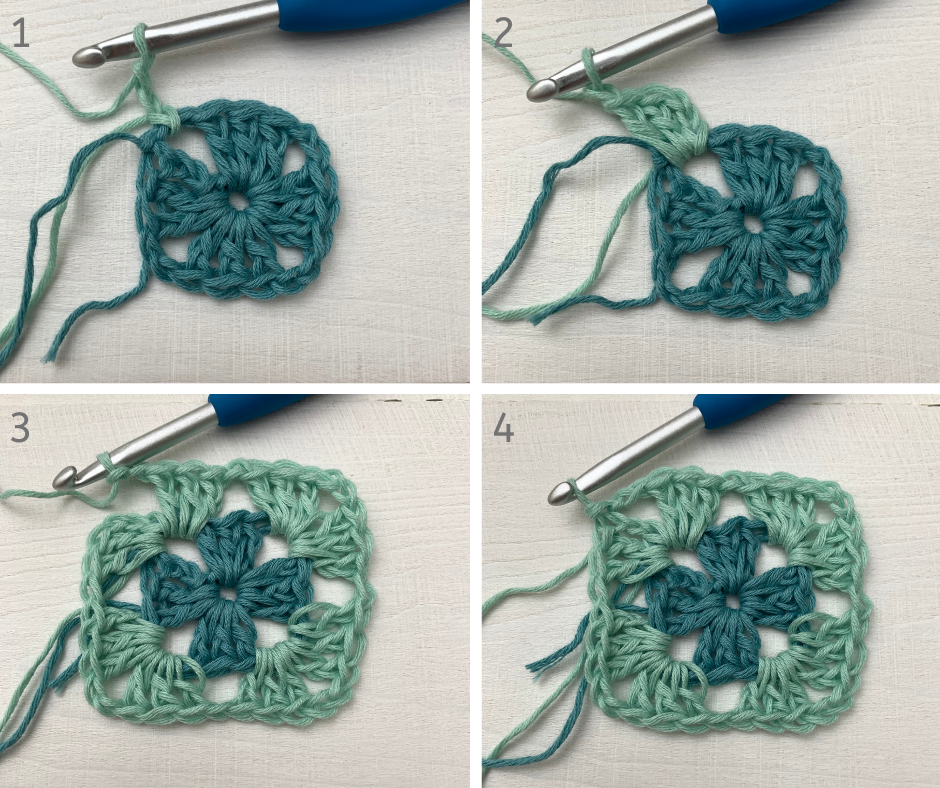
Round 3 (Color A): Add new yarn into any of the ch 2 sp/the corner, ch 3 (count as 1 dc), 2 dc into the same ch 2 sp, ch 1, 3 dc into the next ch 1 sp , ch 1, *(3 dc, ch 2, 3 dc All into the next ch 2 sp/the corner), ch 1, 3 dc into next ch 1 sp, ch 1* REP from *TO* around and for last sp is going to be the same sp that we did the fist 3 ch and 2 dc/the corner, 3 dc into that sp, ch 2, sl st into the third ch, cut the yarn and leave about 10-12″ long tail. Check picture below
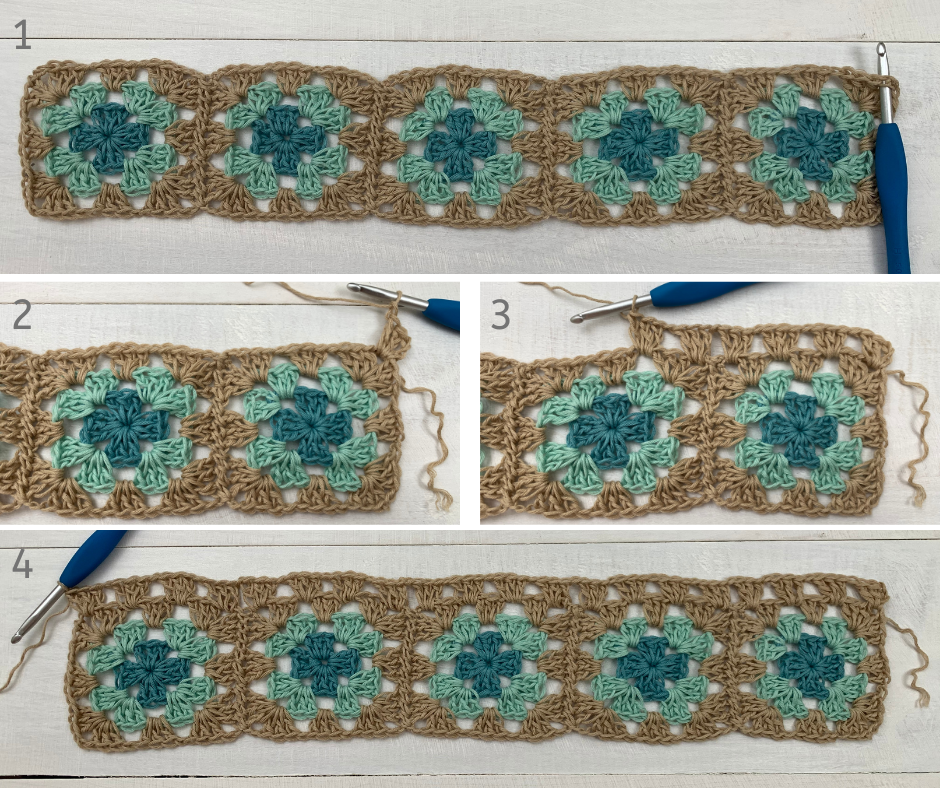
Sew The Squares Together
To sew the squares together, you can use which ever method you prefer. Using the tail that we left earlier to sew, I place the right side of the squares facing up and I’m going to sew on the right side. Check picture below and remember that the pictures shown is size small, if you’re making different sizes, the number of the squares will be different. After you’ve sewn all squares together, you can weave all the ends now or you can do it later.

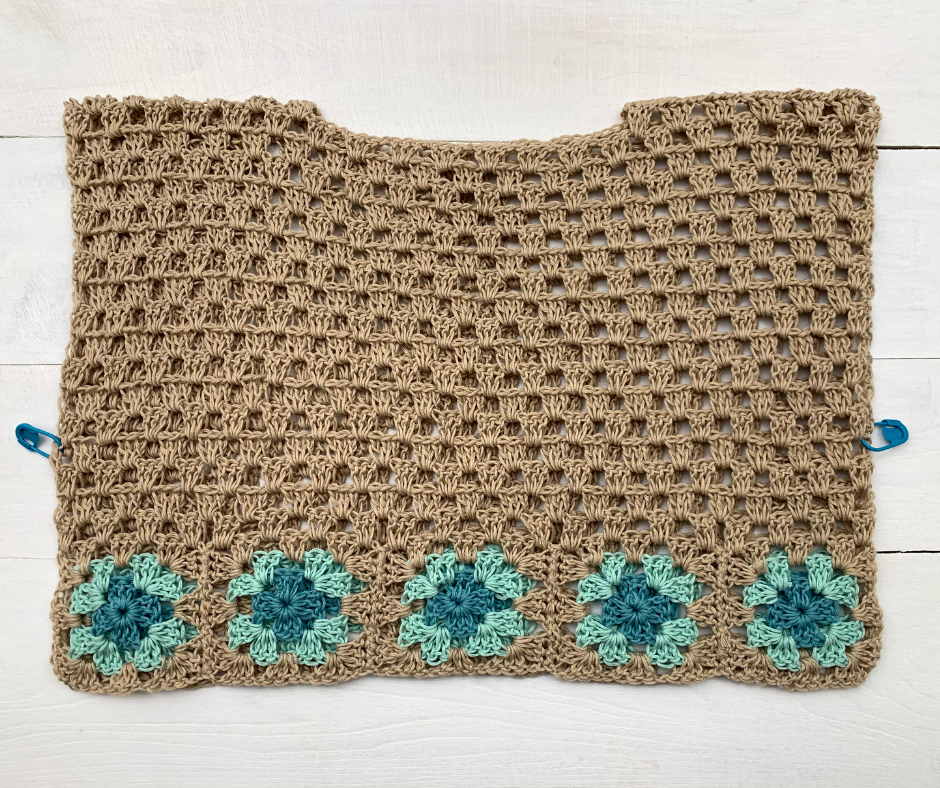
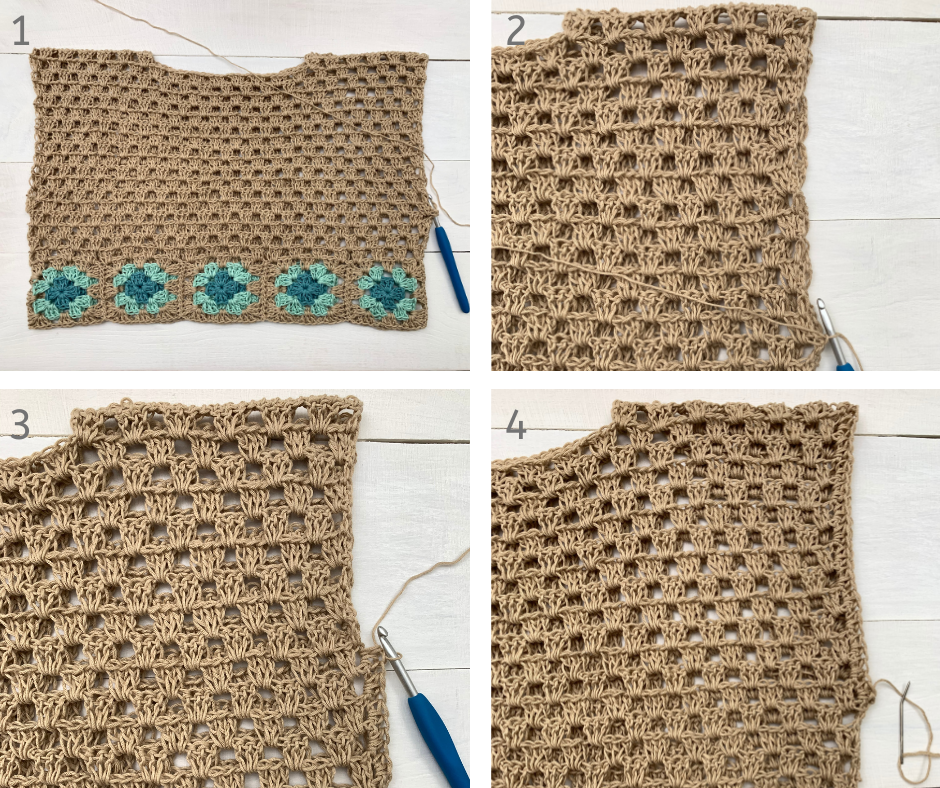
The Crochet Crop Top Pattern Body
Notes:
- For the body we’re going to use color A
- Place the squares that we’ve sewn right side facing up.
Row 1 (RS): Add new yarn into the right corner the square at the ch sp. Then, ch 3 (count as 1 dc), 2 dc into same sp, *ch 1, 3 dc into next ch sp*, REP from *TO* into each ch sp across. Total of 63( 79, 95, 111, 127, 143 ) st including the ch sp. Check picture below
Row 2 (WS): Turn, ch 4 (count as 1 dc and ch 1 sp), *3 dc into ch 1 sp, ch 1* Rep from *TO* across, end with 1 dc into the third ch. Total of 63( 79, 95, 111, 127, 143 ) st including the ch sp. Check picture below

Row 3: Turn, ch 3 (count as 1 dc), 2 dc into the first ch 1 sp, *ch 1, 3 dc into next ch 1 sp* REP from *TO* across. Total of 63( 79, 95, 111, 127, 143 ) st including the ch sp. Check picture below
REP Row 2 and Row 3, 7( 7, 8, 9, 10, 10 ) more times. You’ll have a total of 17( 17, 19, 21, 23, 23 ) rows
Row 18( 18, 20, 22, 24, 24 ): Turn, ch 4 (count as 1 dc and ch 1 sp), 3 dc into ch 1 sp, *ch 1, 3 dc into next ch 1 sp* REP from *TO* into each of next 2( 4, 6, 7, 9, 11 ) sp then cut the yarn, sk 7( 7, 7, 9, 9, 9 ) ch sp, add new yarn into next sp then, ch 3 (count as 1 dc), 2 dc into same sp, ch 1, *3 dc into next ch 1 sp, ch 1*, REP from *TO* across, end with 1 dc into the third ch. Cut the yarn and leave about 14-20″ long tail. Check picture below
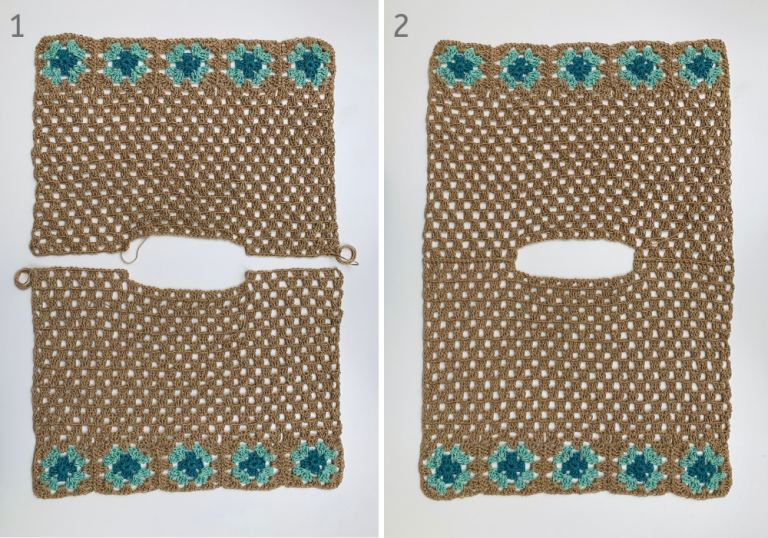
Joining The Top Pieces Together
Sew the shoulder seams together
Take the back and front panel, place them with the correct side facing down, then we’ll sew on the wrong side. Using the tail that we left earlier, sew along the top of the shoulder seam areas together using method of choice. Check picture below
Sew The Sides Together
Fold your top in half at the shoulder seams with the right side facing each other, we’ll sew on the wrong side. Cut a new strand of yarn 18-24 inches long, enough to sew the side seams up to the arm pit. Start sewing from the bottom up to the side seam about 5 and a half inches for all the sizes, using method of choice. *If you want smaller arm holes, just sew more. If you want bigger arm holes, just sew less but make sure that both sides are even. Check picture below

Crochet Around The Sleeve Edges
Note: We’re going to crochet into the end of the row of the sleeve edge (sp for reference)
Turn your top right side facing out, add new yarn into the arm pit corner, then ch 1 (do not count as a st), 2 hdc into each sp around the sleeve edge, cut the yarn and weave all the ends. Both sides are made the same. Check picture below
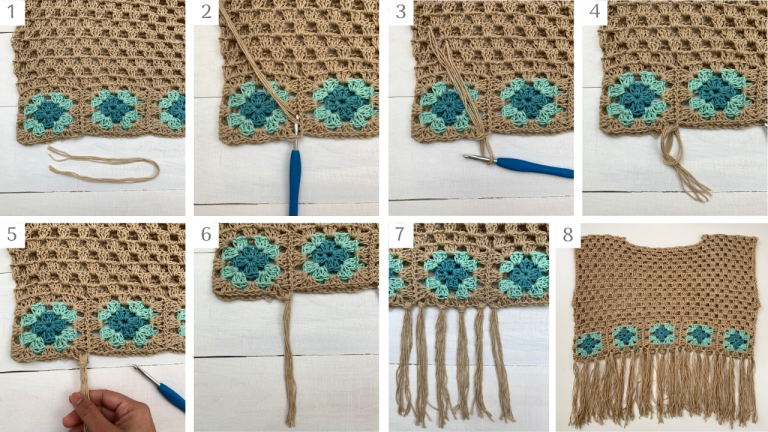
Adding Fringes (Optional)
Cut 128( 160, 192, 224, 256, 288 ) pieces of 12″ of yarn/fringe and if you’d like a shorter or longer fringe, just cut them shorter or longer but remember that the length of the finished fringe will be almost haft of the length that you cut. For example, I cut my fringe 12″ long and my fringe will be 6″ long before I trim the ends so my finished fringe is about 5 – 5.5″ after I trim the ends.
Fringe (Row 1)
Step 1: Take 4 pieces of fringe and fold in half. See picture 1
Step 2: Insert into the ch sp and make sure that the loop is big enough to pass ends through. See pictures 2 and 3
Step 3: Pass the ends through the loop and tighten. See picture 4, 5 and 6
Repeat steps 1 – 3 into each ch sp around. See pictures 7 and 8
Fringe (Row 2) *making the knots
Step 1: Take half of the fringe from the left and right fringe from each fringe “group” or tassel. These will combine to make the finished fringe tassel. See picture 1
Step 2: Make a knot. I make a knot about 1 inch below the first row of the fringe knots. See picture 2
Step 3: Tighten up. See picture 3
Repeat steps 1 – 3 around. See pictures 4, 5, 6, and 7
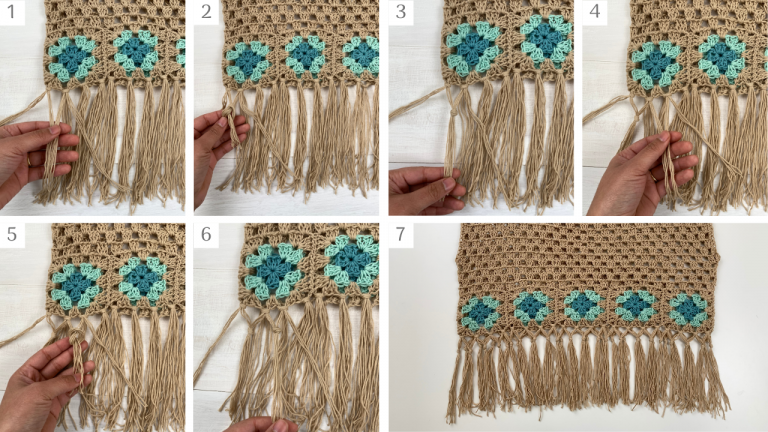
Next, you just need to trim all the ends and make sure it’s nice and even.
Now you’re done, congrats on finishing this crochet crop top pattern!
I hope it went smoothly for you. Don’t forget to share with us all on social media. Until next time.


