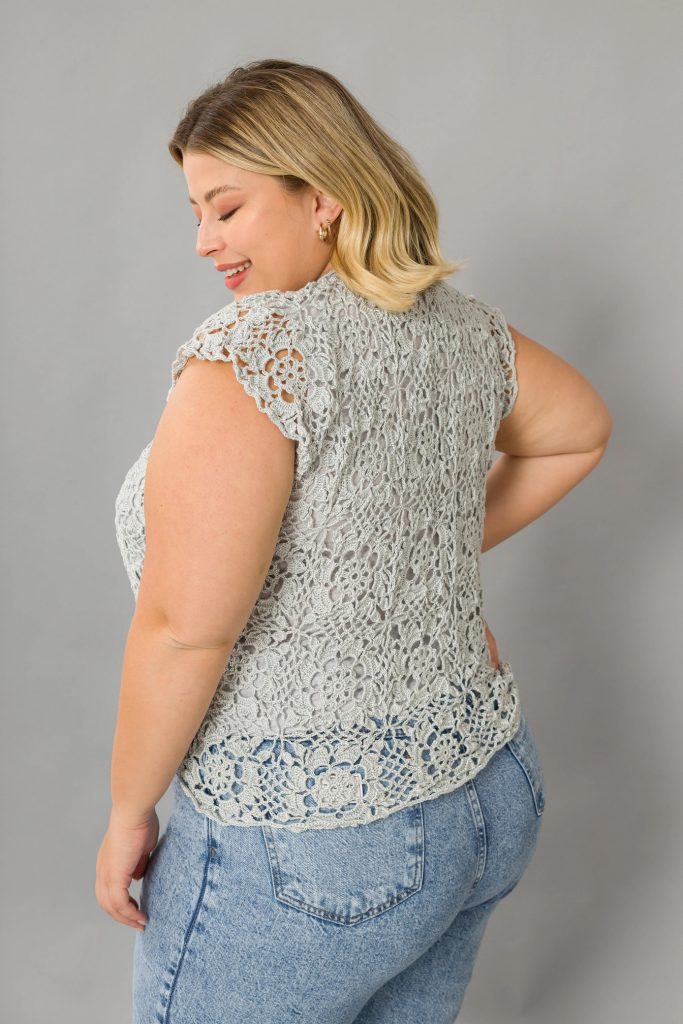
Crochet Patterned Blouse
We have prepared a wonderful example of knitting vest models. A magnificent vest made from lace samples. It looks very nice in knitting with the motifs we use in lace models. We use it a lot in knit vest models, knit cardigan models, summer knitting models and their construction. Today, let’s talk about the recipes we use in summer knitting vest models. Patterned bolero vest is one of the examples that we will knit by adjusting the length of the vest as we want. Making a lace motif vest is one of the recipes that we can knit with mercerized threads. Finally, let’s talk about making a summer knitted vest with crochet. Then you can review previous content for more. Now let’s move on to the explanation of our new model. Crochet motif blouse explanation is just below.
Patterned Blouse Making
A wonderful knitted vest for the large size. If I’m not mistaken from the translation, it’s knitted for size 50. If you wish, you can use the lace sample used in the summer blouse model in your different designs. You can make tablecloths, runner models. You can use it on cardigans, vests.
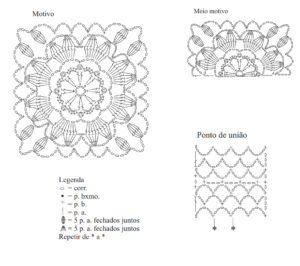

The diagram of the lace we will use in our blouse is as above. You can knit in smaller sizes by adjusting the number of motifs. A blouse knitted with 1.5 mm crochet and cotton threads. The approximate size of the motif is around 10 cm. Of course, these dimensions will vary according to the thickness and thinness of the rope used.
If you have any questions about the scheme, you can contact us in the comment section. In the diagram, circle means chain, + sc, long line handrails. Finally, let’s examine how it will look when the crochet motif blouse is finished.

EXECUTION
Size: 50
Points used:
Chain (corr.). Very low stitch (p. low.): Insert the ag., loop., pull the p. and go directly to p. da ag.. Low point (p. b.): enter a ag. loop., pull the p. and with another loop, rem. all p.. Double crochet (s.c.): loop, introduce ag., loop., pull p. lac., rem., 2 p. and with another loop, rem. all p.. Cordão – with as. crochet make a corr. of 3 p., go back, introduce the ag. in the 2nd corr. pull the thread and leave it in ag. (there are 2 p. in the ag.), introduce the ag. in the 3rd corr. pull the thread and leave it in ag. (there are 3 p. in the ag.), *without turning the work, release the last 2 p. of the ag. and hold tight so it doesn’t fall apart. Do 1 p. on p. that stayed in the ag., then introduce the ag. on the 1st p. loose, pull the thread and leave it in ag. (there are 2 p. in the ag.), introduce the ag. on the 2nd p. loose, pull the thread and leave it in ag. (there are 3 p. in the ag.), *. repeat from * to * until the desired size is completed. With the size ready, pass the yarn through the 3 p. of the ag. and rem.. Straighten the cord to make it round. Join point: follow the chart. Reason: follow the chart. Half reason: follow the chart.
Sample:
Each motif measures 10 cm x 10 cm
Execution
Front/back:
They are worked together and in motifs. Reason – Make a run. with 6 p. close in a circle and work the motif following the chart. Finished the graphic rem.. Make 28 equal motifs, joining them together during the last row. following the assembly diagram in the mould. Join the shoulders, but leave the sides open. Half reason – Do a corr. with 6 p. close in a circle and work the half motif following the chart. Finished the graphic rem.. Make 2 equal half patterns, joining them together and in the patterns during the last row. following the assembly diagram in the mould. Half motifs are shown with the dotted line. Finished the motifs and half motifs, make the p. of union following the graph. Finished the graphic rem.. Make 2 strands following the recipe with 60 cm each strand.

Finishing:
Make a row in the front opening between the half motifs. on p. B. and rem.. Do all around the neckline 3 rows. on p. The. with 230 p. The. in each car. and rem.. Divide the lastex into 2 equal parts. Fold each part in half and pass a part along the base of the 1st row. on p. The. and the other part at the base of the 3rd row. on p. a.. Attach the two ends at the beginning and end of each row. not to let go and give the ruffled effect in the neckline finish. Make a row around each armhole and on the bottom edge of the piece. on p. B. and rem.. Attach a strap to tie on each side of the neckline.


